Swift Audit Strategies: Security, Performance, Memory and Accessibility
Auditing a Swift project goes beyond just hunting for bugs. It's a methodical approach that evaluates the overall health of an application across four fundamental axes: security, performance, memory management, and accessibility. This article guides you through the tools, methodologies, and best practices for conducting effective audits on your iOS applications and Swift packages.
🎯 Introduction to Audits
A software audit is a systematic examination of an application's code, architecture, and behavior. For Swift projects, this practice becomes essential given the increasing demands from users, stores, and regulations.
Why Audit?
The motivations for an audit are multiple and often interconnected:
Quality constitutes the first line of defense: clean, performant, and accessible code reflects team professionalism and reduces technical debt in the long run.
Security protects user data and company reputation. A security breach can cost millions in GDPR fines and destroy user trust.
Compliance becomes critical with the EU Accessibility Act 2025, GDPR, and App Store Review Guidelines requirements. Regular audits prevent rejections and sanctions.
Finally, performance directly impacts user retention — a Google study shows that an app taking more than 3 seconds to load loses 53% of its mobile users.
When to Audit?
The timing of an audit depends on your project context:
- Before a major release: complete verification of all four axes to avoid post-deployment surprises
- Periodically: quarterly audits to maintain consistent quality and detect drift
- After an incident: targeted forensic analysis to understand root cause and prevent recurrence
- When taking over a project: technical debt assessment before planning evolutions
- Before certification: preparation for external audits (SOC 2, ISO 27001, etc.)
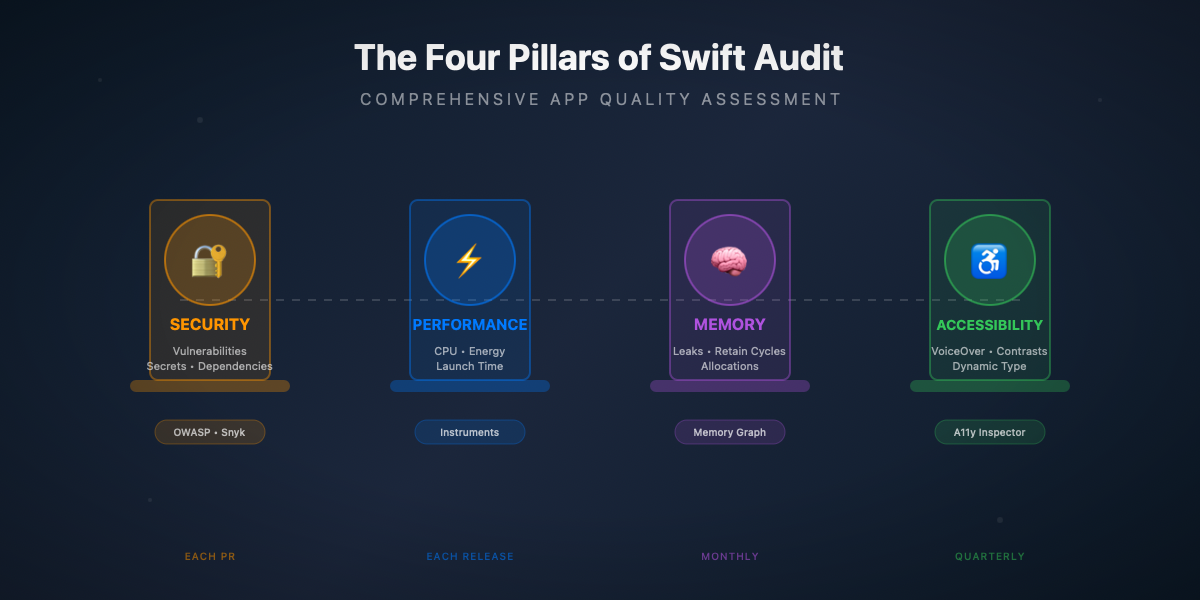
The Four Pillars of a Swift Audit
| Pillar | Main Focus | Main Tools | Recommended Frequency |
|---|---|---|---|
🔐 Security | Vulnerabilities, secrets, dependencies | SwiftLint, Semgrep, Snyk | Each PR + weekly |
⚡ Performance | CPU, memory, energy, launch time | Instruments, MetricKit | Before each release |
🧠 Memory | Leaks, retain cycles, allocations | Memory Graph, Leaks | Monthly + targeted debug |
♿ Accessibility | VoiceOver, Dynamic Type, contrasts | Accessibility Inspector | Quarterly + new features |
Apple Tools vs Third-Party Tools
Apple provides a complete ecosystem of tools integrated into Xcode. Instruments offers a suite of profilers for performance, memory, and energy. The Memory Graph Debugger visualizes object relationships in real-time. The Accessibility Inspector verifies VoiceOver compliance and contrasts. These tools benefit from perfect native integration and exhaustive official documentation.
Third-party tools like SwiftLint, SonarCloud, or Snyk bring complementary features: advanced static analysis with customizable rules, native CI/CD integration, and automatic vulnerability detection in SPM dependencies.
The optimal strategy combines both approaches: Apple tools for runtime analysis and interactive debugging, third-party tools for automation and continuous integration in your development pipeline.
🔐 Security Audit
The security audit identifies vulnerabilities before they are exploited. It relies on proven frameworks like OWASP and specialized tools for static and dynamic analysis.
OWASP Mobile Top 10
The OWASP Mobile Application Security defines the ten major risks for mobile applications. Each category deserves special attention during a security audit.
M1 — Improper Platform Usage
This category covers the misuse of system APIs, particularly sensitive data storage. The iOS Keychain is the recommended solution for storing credentials, tokens, and other secrets.
The following code implements a secure storage manager using the Keychain. The SecureCredentialStorage struct is marked Sendable to ensure thread-safety in Swift 6. It encapsulates four operations: storage, retrieval, deletion, and update. The protection level kSecAttrAccessibleWhenUnlockedThisDeviceOnly ensures that data is only accessible when the device is unlocked and is never transferred during restoration to another device.
Usage example — Here's how to use this manager to store and retrieve an authentication token. Test this code in a Playground or in your app to verify proper operation:
M2 — Insecure Data Storage
Insecure storage of sensitive data is one of the most frequent vulnerabilities. The auditor must verify that sensitive data is not stored in UserDefaults, in unprotected files, or in unencrypted SQLite databases.
The following auditor scans UserDefaults for keys whose names suggest sensitive data (password, token, secret, etc.), then verifies that files in the Documents directory with sensitive extensions (json, plist, sqlite, etc.) have the file protection level FileProtectionType.complete.
Usage example — Test the auditor by creating problematic data then running the scan:
Hardcoded Secrets Detection
Secrets in source code constitute a major risk. An API key committed by mistake can be extracted from the binary or found in Git history.
The following scanner uses regular expressions to detect common patterns: AWS keys (AKIA... format), GitHub tokens (gh[pousr]...), Stripe keys (sk_live...), PEM private key headers, etc. It ignores comment lines to reduce false positives.
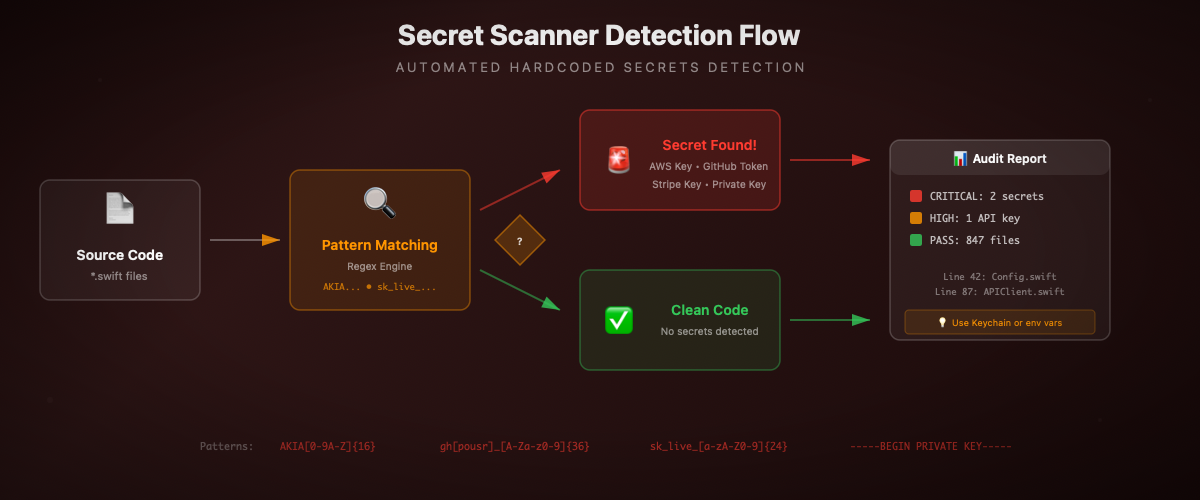
Usage example — Test the scanner with code containing secrets:
SPM Dependency Audit
Third-party dependencies can introduce known vulnerabilities (CVE). The Snyk tool analyzes the Package.resolved file to identify vulnerable packages.
The following Swift helper parses the Package.resolved file and generates a dependency report. It also identifies potentially risky dependencies (no semantic version, non-GitHub source, etc.).
Usage example:
Network Security: ATS and Certificate Pinning
App Transport Security (ATS) enforces HTTPS for all connections. Certificate pinning adds a layer by verifying that the server certificate matches a known fingerprint.
The following code implements certificate pinning using CryptoKit to calculate the SHA256 hash of the server certificate's public key. The urlSession(_:didReceive:) method is called automatically by URLSession when establishing an HTTPS connection.
Usage example — Pinning configuration and ATS audit:
⚡ Performance Audit
The performance audit identifies bottlenecks that degrade user experience. Xcode Instruments is the central tool, complemented by MetricKit for production data.
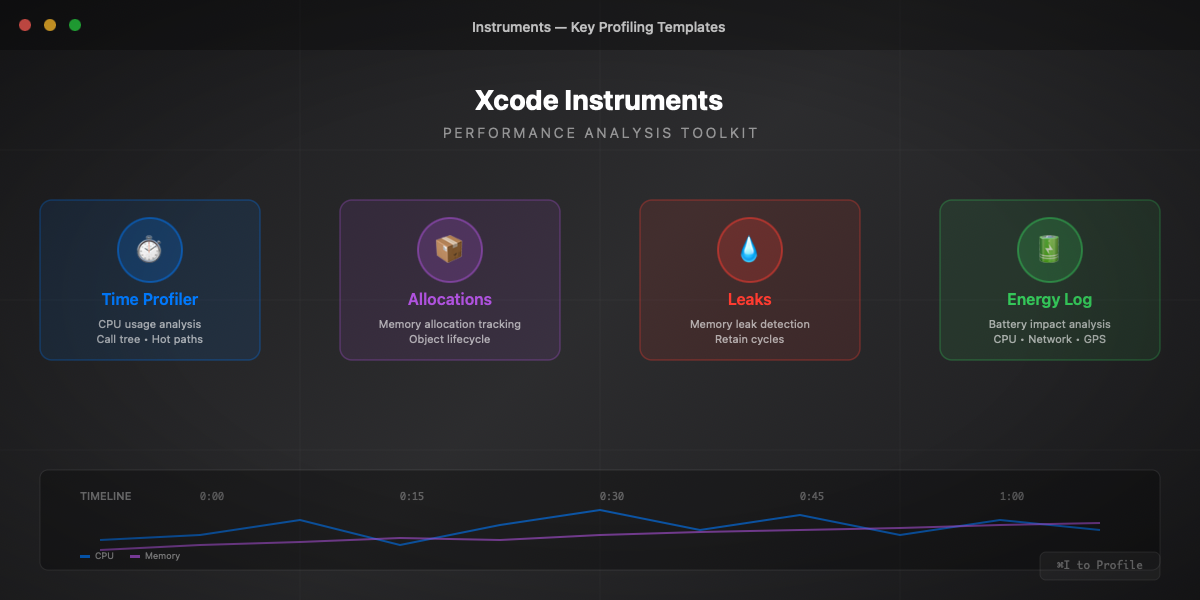
Instruments: Time Profiler
Time Profiler captures CPU usage and identifies the most expensive functions. For precise measurements in your code, use os_signpost which integrates perfectly with Instruments.
The following code creates a logger dedicated to performance measurements. Signposts appear in Instruments under "Points of Interest", allowing you to visualize the duration of each operation on the timeline.
Usage example — Measure different operations to identify bottlenecks:
Launch Time Tracking
Launch time is critical for user retention. Apple recommends less than 400ms to display the first screen. The following tracker records launch milestones and generates a detailed report.
Usage example — Integration in a SwiftUI app:
MetricKit: Production Data
MetricKit collects performance metrics directly from users' devices in production. This data is aggregated and anonymized by iOS, then delivered daily to your app via the MXMetricManagerSubscriber delegate.
Metrics include: launch time, peak memory, CPU/GPU time, network transfers, crashes, hangs (UI blocked >250ms), and excessive disk writes.
Usage example — Integration in AppDelegate:
Xcode Organizer Insights
Xcode Organizer aggregates production metrics reported by MetricKit. Access: Window → Organizer → Metrics.
| Metric | Target | Impact |
|---|---|---|
Launch Time | < 400ms | User retention |
Hang Rate | < 1% | Smooth experience |
Memory Peak | < 200MB | Stability |
Memory Suspended | < 50MB | Background lifetime |
Disk Writes | Minimize | Storage lifetime |
🧠 Memory Audit
The memory audit detects leaks and optimizes the application's memory footprint. Memory leaks progressively degrade performance and can lead to crashes from resource exhaustion.
Memory Graph Debugger
Xcode's Memory Graph Debugger visualizes the object graph in memory in real-time. To use it:
- Launch the application in Debug mode
- Click the "Debug Memory Graph" icon in the debug bar (three connected circles)
- Xcode pauses the app and displays the object graph
Look for:
- Unexpected objects (too many instances of a class)
- Circular references indicated by a purple exclamation mark
- Orphan objects without a legitimate owner
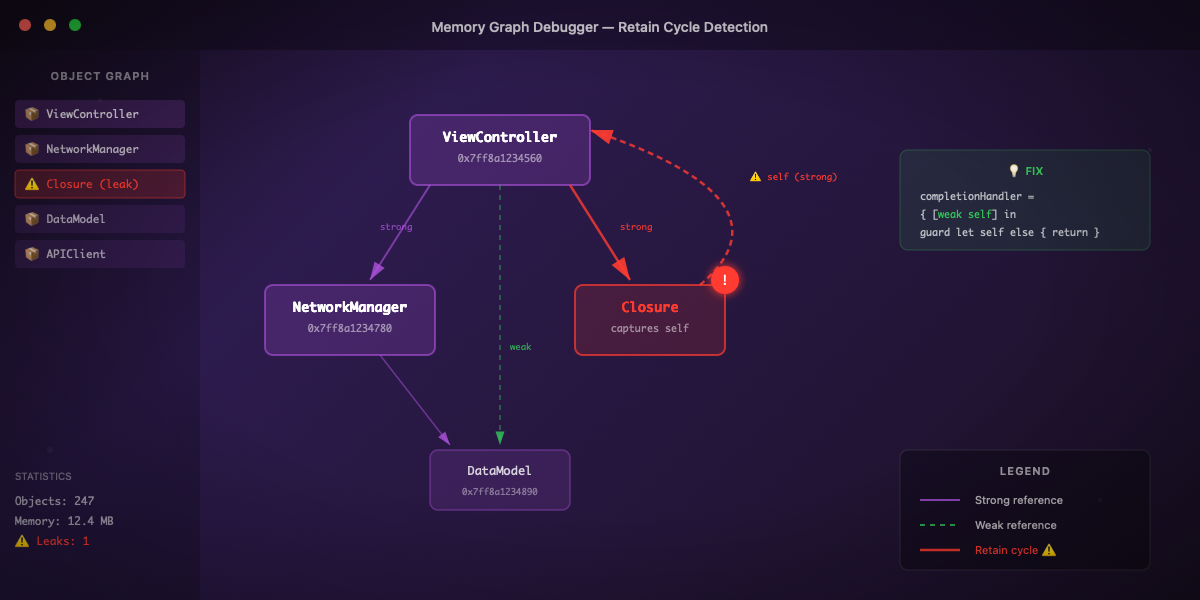
Retain Cycle Detection
Retain cycles prevent object deallocation. They occur when two or more objects reference each other with strong references.
The following code illustrates the classic problem: a closure stored as a property captures self strongly, creating a cycle self → closure → self. The object will never be deallocated because its reference count can never reach zero.
The solution is to use [weak self] in the closure's capture list. This breaks the cycle by creating a weak reference to self that becomes nil if the object is deallocated.
Usage example — Test both versions to see the difference:
Lifecycle Tracking Utility
To detect leaks during development, here's a utility that counts allocations and deallocations by type. Any object with a count > 0 after a complete action is suspect.
Usage example — Integrate the tracker into your classes:
Weak vs Unowned: Choice Guide
The choice between weak and unowned depends on the relative lifecycle of the objects.
Weak: the reference automatically becomes nil if the object is deallocated. Use it when the referenced object can be deallocated before or during use of the reference.
Unowned: the reference is not optional and never becomes nil. Accessing a deallocated object via unowned = CRASH. Use it only when you are certain the object will always survive as long as the reference.
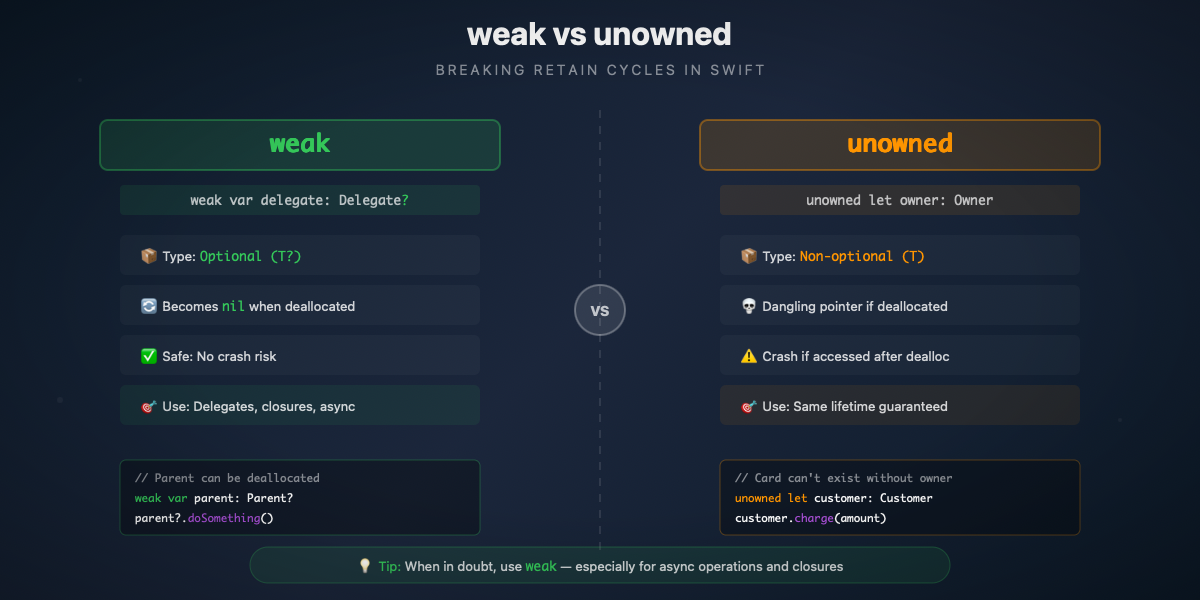
Rule for async closures — Always use weak with asynchronous operations because the object can be deallocated before the operation completes.
Usage example:
Zombie Detection
Zombies are deallocated objects that are still referenced. Accessing a zombie causes a crash that is difficult to diagnose.
Activation: Product → Scheme → Edit Scheme → Run → Diagnostics → Zombie Objects
When enabled, deallocated objects are replaced by "zombies" that log invalid accesses instead of crashing silently.
Usage example:
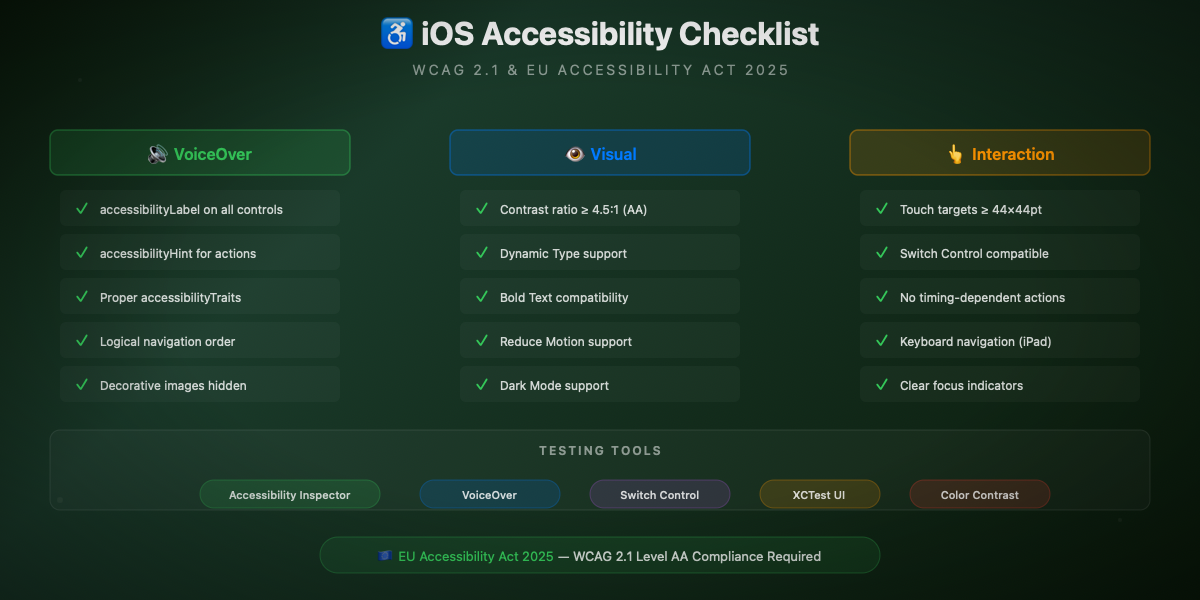
♿ Accessibility Audit
Accessibility is no longer optional. The EU Accessibility Act 2025 imposes legal requirements for digital applications sold or used in the European Union. Beyond compliance, an accessible app reaches a wider audience.
Accessibility Inspector
Xcode's Accessibility Inspector audits interface elements in real-time:
Xcode → Open Developer Tool → Accessibility Inspector
The inspector verifies:
- Labels: text read by VoiceOver for each element
- Hints: action description (e.g., "Double-tap to activate")
- Traits: element type (button, link, header, etc.)
- Contrasts: contrast ratio between text and background
- Navigation order: logical VoiceOver reading sequence
Accessible SwiftUI Implementation
The following SwiftUI components demonstrate accessibility best practices. Each interactive element has a descriptive accessibilityLabel and an accessibilityHint explaining the action.
Usage example:
WCAG Contrast Checker
Contrast between text and background is essential for readability. WCAG 2.1 defines minimum ratios: 4.5:1 for normal text, 3:1 for large text (≥18pt or ≥14pt bold).
The following checker calculates relative luminance according to the WCAG formula and determines if the ratio satisfies AA or AAA levels.
Usage example:
Automated Accessibility Tests
UI tests can automatically verify certain accessibility criteria:
EU Accessibility Act 2025
The European Accessibility Act has imposed requirements since June 2025 for apps sold or used in the EU. WCAG 2.1 Level AA minimum criteria:
| Criterion | Requirement | Verification |
|---|---|---|
Perceivable | Text alternatives | accessibilityLabel on images |
Perceivable | Sufficient contrast | Ratio ≥ 4.5:1 (normal text) |
Operable | VoiceOver navigation | All elements reachable |
Operable | Sufficient time | No timeout without option |
Understandable | Clear language | Descriptive labels |
Robust | Compatibility | VoiceOver, Switch Control tests |
🛠️ Tools and Automation
SwiftLint Configuration for Audit
SwiftLint applies style rules and can detect certain security issues. The following configuration enables audit-oriented opt-in rules and defines custom rules to detect secrets and prints in production.
CI/CD Integration with GitHub Actions
Local Audit Script
📊 Audit Report Template
The following generator consolidates findings from all audit types and generates a Markdown report with scoring and prioritized action plan.
Usage example:
🚀 Going Further
Official Resources
- Apple Instruments Documentation — Complete guide to Xcode profiling tools
- Apple Accessibility Programming Guide — Best practices and iOS accessibility APIs
- OWASP Mobile Application Security — Mobile security testing standards and guides
- WCAG 2.1 Quick Reference — Web accessibility criteria applicable to mobile
- MetricKit Documentation — Production performance metrics collection
- EU Accessibility Act — European digital accessibility regulation
Recommended Tools
- SwiftLint — Swift linter with customizable rules for quality and security
- Snyk — SPM dependency vulnerability analysis with CI integration
- SonarCloud — Continuous code quality analysis with detailed metrics
- Semgrep — Static analysis with custom rules for security patterns
Related Atelier Socle Articles
- CryptoKit: Fundamentals Guide — Security and cryptography in Swift
- Swift Testing: The Complete Guide — Modern testing framework with Swift Testing
- SwiftUI Design System — Maintainable and scalable UI architecture